SQL Update Statement – Update Query In SQL
The Update is one of the DML (data manipulation) commands that are essentially used to update the existing data in the records/tuples. Pick a case of a company as an example that maintains the database for all the employees working for the company. But what happens when an employee decides to leave the company?
His status has to be changed in the database from current to ex-employee. For that matter, all the processes such as de-allocation from the project, salary calculation have to be stopped and all this needs updating of data in various tables and that is where update comes to our rescue.
SQL Update Statement – Update Query In SQL
To understand the syntax and to look into various examples with query outcomes for different scenarios, stay tuned!
The basic syntax for the update statement is as follows:
| UPDATE table_name SET column_1 = value_1, column_2 = value_2, …., column_n = value_n [WHERE condition]; Here, table_name: Name of the table in which you want to make an update column_1, column_2: Name of the columns or attributes whose value you want to modify value_1, value_2: New values given to replace the old values in the corresponding rows condition: one or multiple conditions can be specified here to filter out the rows |
Note: To make it handy for you, we have provided the queries used to create the test data (table and inserting the records in the table). You can find it at the end of this section. You may execute those set of statements in your database to get started with UPDATE hands on.
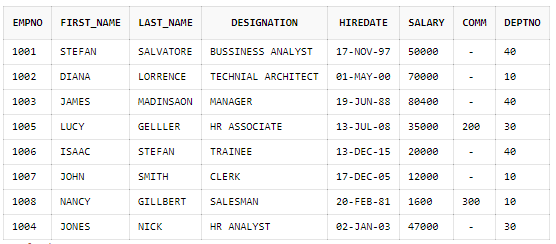
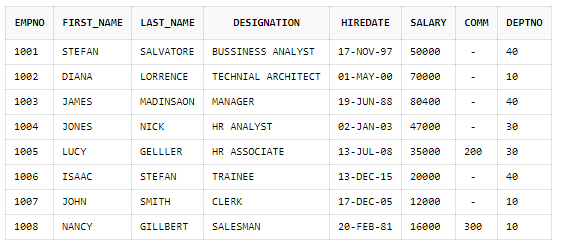
A Sample table – EMPLOYEE
SELECT * FROM EMPLOYEE;
Scenario 1: Update a single row in the table
You may wish to update just one row of a table. In such a case, simply mention one or multiple conditions in the where clause. Furthermore, you may choose to update either single or multiple columns.
Case 1: Updating value in the single column
Check out below, we are updating or specifically setting the salary of an employee to 18000 (whose employee no. is 1008).
UPDATE EMPLOYEE
SET SALARY = 18000
WHERE EMPNO = 1008;
Query Output:
As you can see “1 row(s) updated” is being displayed which notifies the number of records that have been updated on the execution of the above update query. And to check the content of the table you can use ‘SELECT * FROM EMPLOYEE’.

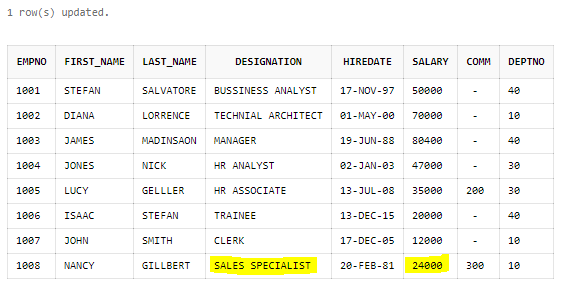
Case 2: Updating values in multiple columns
Unlike the previous example which updated only one column, here we choose to update both employee’s designation and salary. Hence, we are updating two columns of a single row at this moment.
UPDATE EMPLOYEE
SET
SALARY = 24000,
DESIGNATION = ‘SALES SPECIALIST’
WHERE EMPNO = 1008;
Query Output:
Scenario 2: Update multiple rows in the table altogether
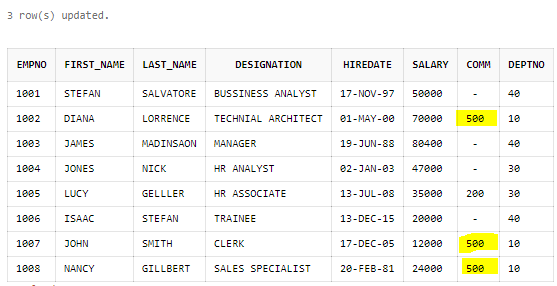
Case 1: Single condition in ‘where’ clause
We have specified one filter condition (DEPTNO = 16) in the where clause which fetches all the records having DEPTNO = 10. In our case, three records are being fetched and updated.
UPDATE EMPLOYEE
SET COMM = 500
WHERE DEPTNO = 10;
Query Output:
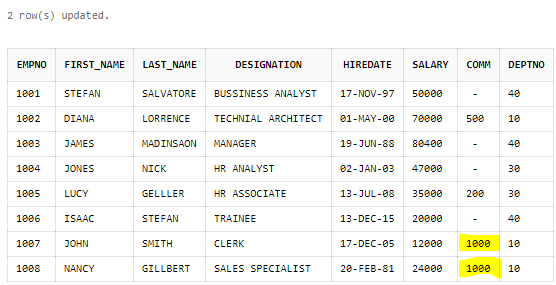
Case 2: Multiple conditions in ‘where’ clause
In this case, we filter records by specifying two conditions separated by the ‘AND’ operator. And thus only those records are fetched and updated which satisfy both the conditions.
UPDATE EMPLOYEE
SET COMM = 1000
WHERE DEPTNO = 10 AND SALARY < 50000;
Query Output:
There are only two records that have DEPTNO as 10 and SALARY less than 5000. Hence, they have been updated.
Scenario 3: Update all the records that exist in the table altogether
You have to be careful when you do not mention any condition in the where clause or more specifically when you do not mention where clause at all. You are inviting trouble in such cases because executing a query without any filter condition, essentially means you are fetching all the rows that exist in the table to make an update. And that being the case, the update takes place for all the rows in that table.
Let us execute the query without any ‘where’ clause.
UPDATE EMPLOYEE
SET LAST_NAME = ‘STEVEN’;
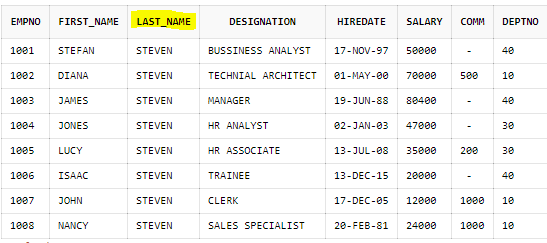
Check out the output below where all the records have their last name as ‘STEVEN’. It must be more clear now as to why we are supposed to be more careful.
Query Output:
Here, we have come to an end of basic-must know regarding the UPDATE command.
The next section covers some of the advanced usages of the UPDATE command when combined with other clauses like select or case-when-then-else.
Note: While you do the mass update, you may want to preview the result as to which records will be selected for updating. In such cases, it is suggested to use a select query which can include the expressions that you had thought of including in your set clause.
Scenario 4: Updating one table using another table
This is useful when you do not want to supply hardcoded values and rather choose to copy and update some or complete data from another table into your table.
To illustrate an example, we require two tables – EMPLOYEE and DEPARTMENT. The Department table is a parent of Employee table. If you refer to the set of queries at the end of this section, you will notice ‘CONSTRAINT FK_DEPT FOREIGN KEY (DEPTNO) REFERENCES DEPARTMENT (DEPTNO)’ specified in the create table query of the EMPLOYEE table. This conveys that the EMPLOYEE has a foreign key reference to the DEPARTMENT table. The foreign key constraint will compulsorily require that the DEPTNO values of the EMPLOYEE table exist in the DEPTNO column of the DEPARTMENT table.
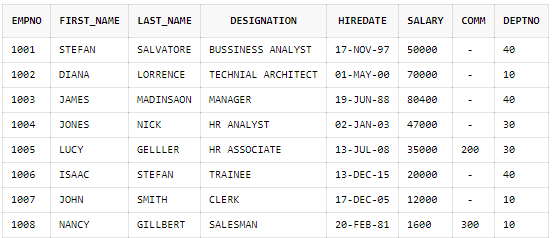
Sample table 1 – EMPLOYEE
SELECT * FROM EMPLOYEE;
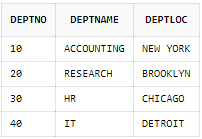
Sample table 2– DEPARTMENT
SELECT * FROM DEPARTMENT;
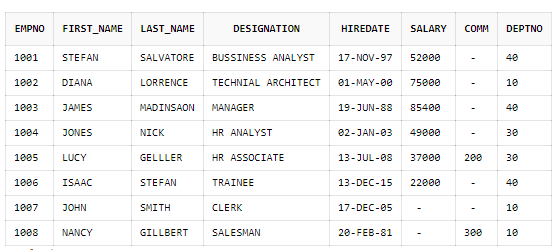
Case 1: Update combined with Select – for all the rows
The statement below compares all the EMPLOYEE’s DEPTNO with the DEPARTMENT’s DEPTNO column. The update takes place for all those records in which DEPTNO of EMPLOYEE’s table exists as DEPTNO in the DEPARTMENT table.
In our case, we are increasing the existing salary in the EMPLOYEE table by 1.1 times for all those records that have DEPTNO in DEPARTMENT.
UPDATE EMPLOYEE
SET SALARY = SALARY *1.1
WHERE DEPTNO IN (SELECT DEPTNO
FROM DEPARTMENT);
Query Output:
The outcome is that the SALARY column is updated for all the records since in the EMPLOYEE table we have DEPTNO 10, 30, 40 and all these are present as DEPTNO in DEPARTMENT.
Case 2: Update combined with select – for filtered rows using where clause
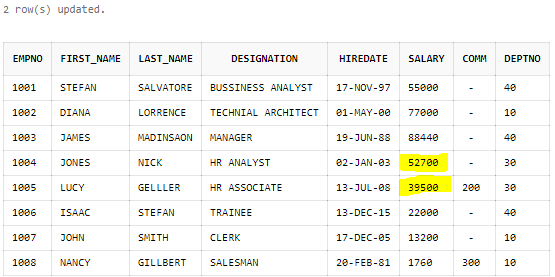
The update statement below first matches DEPTNO of EMPLOYEE with DEPTNO of the DEPARTMENT table then filters out those records with department name as ‘HR’. Right after this, the update takes place for all those records where match is found. We update the salary column by increasing its value by 1000 for such records.
UPDATE EMPLOYEE
SET SALARY = SALARY + 1000
WHERE DEPTNO IN (SELECT DEPTNO
FROM DEPARTMENT
WHERE DEPTNAME = ‘HR’);
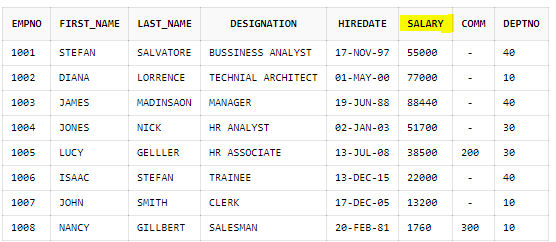
Query Output:
The highlighted values of the SALARY column in the below screenshot are ones that got updated after the execution of the query.
Scenario 5: Using case-when-then-else clause in Update Statement
We all know the basic if-else or case block. What if you want to achieve such functionality in your update statement? Say, if the first condition is satisfied then you want to update one column and if the second condition is satisfied then you want to update some other column. Do we have a workaround for this too? Absolutely yes!
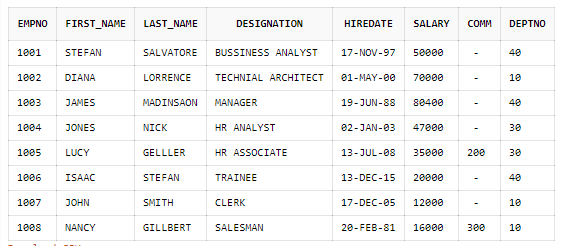
Look at the SALARY column of EMPLOYEE table below. Let us proceed to perform some updates on the same.
SELECT * FROM EMPLOYEE;
The general form is as shown below:
Here, we have the case-when-then-else block. In this special case, it first checks if there are records with a salary greater than or equal to 20000 and less than or equal to 50000. If match is found, it adds 2000 to the existing salary. In the second condition, it checks if the salary is greater than 50000 for any records. If so, adds up 5000 to the existing salary. Notice that the remaining records will have a null salary since we have not mentioned any condition in it and that is the reason we should be very careful while we perform an update.
UPDATE EMPLOYEE
SET SALARY = CASE
WHEN SALARY >= 20000 and SALARY <= 50000 THEN SALARY + 2000
WHEN SALARY > 50000 THEN SALARY + 5000
END;
Query Output:
Update dealing with constraint violations
The moment you run the update statement, it first starts figuring out whether the mentioned columns have to be updated or not. If yes, only then it carries out the update operation else throws an error.
Consider the table EMPLOYEE, the result set of ‘SELECT * FROM EMPLOYEE’ is shown below.
Among the various reasons due to which the update operation fails, we have listed the most common ones below.
Unique key violation:
This occurs when you are trying to update a column that is already defined with a unique constraint which is essentially checks that no duplicate values are added in that particular column.
For instance, in the above table EMPNO column is defined with PRIMARY KEY constraint (defines that the values defined in this column should always be unique and not null). So, let us now try to update a record that will have the same value as that of the existing value in the column EMPNO.
Trying to update the column EMPNO whose value is 1004 (or first_name = JONES) to 1008. Ideally, it has to give an error when we try update since EMPNO is a primary key column that does not accept duplicates values. Since there is an existing record with EMPNO 1008 already, we cannot update any other record to have EMPNO as 1008 in its EMPNO column.
Execute the query below:
Update EMPLOYEE
SET EMPNO = 1008
WHERE
FIRST_NAME = ‘JONES’;
Look at the output

It notifies us that the unique constraint has been violated and hence the update does not take place.
Let us now proceed to check if the update takes place by supplying the existing value in the other column that does not have unique constraint defined on it. Say FIRST_NAME, you must know that FIRST_NAME can accept duplicate values since it is not defined with a unique constraint or primary key constraint.
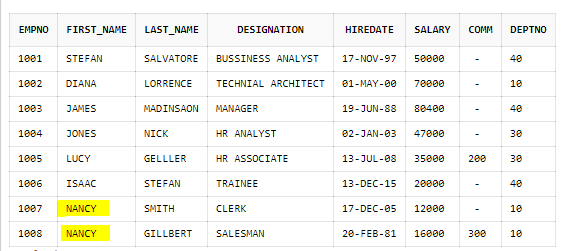
For instance, the record with EMPNO 1008 already has the first name as ‘NANCY’. However, we will now try to update the record with EMPNO =1007 with the same first name (‘NANCY’).
Update EMPLOYEE
SET FIRST_NAME = ‘NANCY’
WHERE
EMPNO = 1007;
Checking the output below, we say that the first name can accept duplicate values.
Output:

Data type conversion:
This occurs when you try to update the value in the column that cannot be converted to the corresponding column’s datatype.
Executing the query below:
Update EMPLOYEE
SET EMPNO = ‘Twenty two’
WHERE
FIRST_NAME = ‘JONES’;
Notice that the above query is trying to update the value in the EMPNO column but with a String value rather than a NUMBER value. When we notice the structure of the table, we understand that while creating the table EMPLOYEE, the EMPNO column is defined as the column of datatype NUMBER. Hence only number values are allowed and not the other datatypes values such as String, date, etc.
And thus executing the above query will return an error shown below which does not allow the update to happen.

It is important to note that, the other way round works fine. That means, if you are trying to update a value in the string datatype column with the number value, it will successfully update the record, the result will now have a string column with a number value in it which is completely fine.
Queries to create the sample data
The mentioned queries below are used to create and insert the data into the sample tables – EMPLOYEE and DEPARTMENT that we have used in all our examples
| To create a DEPARTMENT table CREATE TABLE DEPARTMENT( DEPTNO NUMBER(2,0), DEPTNAME VARCHAR2(14), DEPTLOC VARCHAR2(13), CONSTRAINT PK_DEPT PRIMARY KEY (DEPTNO) ); To create an EMPLOYEE table CREATE TABLE EMPLOYEE( EMPNO NUMBER(4,0), FIRST_NAME VARCHAR2(10), LAST_NAME VARCHAR2(10), DESIGNATION VARCHAR2(30), HIREDATE DATE, SALARY NUMBER(7,2), COMM NUMBER(7,2), DEPTNO NUMBER(2,0), CONSTRAINT PK_EMPL PRIMARY KEY (EMPNO), CONSTRAINT FK_DEPT FOREIGN KEY (DEPTNO) REFERENCES DEPARTMENT (DEPTNO) ); To insert rows into the DEPARTMENT table INSERT INTO DEPARTMENT (DEPTNO, DEPTNAME, DEPTLOC) VALUES (10, ‘ACCOUNTING’, ‘NEW YORK’); INSERT INTO DEPARTMENT (DEPTNO, DEPTNAME, DEPTLOC) VALUES (20, ‘RESEARCH’, ‘BROOKLYN’); INSERT INTO DEPARTMENT (DEPTNO, DEPTNAME, DEPTLOC) VALUES (30, ‘HR’, ‘CHICAGO’); INSERT INTO DEPARTMENT (DEPTNO, DEPTNAME, DEPTLOC) VALUES (40, ‘IT’, ‘DETROIT’); To insert rows into the EMPLOYEE table INSERT INTO EMPLOYEE VALUES ( 1001, ‘STEFAN’, ‘SALVATORE’, ‘BUSSINESS ANALYST’, TO_DATE(’17-11-1997′,‘DD-MM-YYYY’), 50000, NULL, 40 ); INSERT INTO EMPLOYEE VALUES ( 1002, ‘DIANA’, ‘LORRENCE’, ‘TECHNIAL ARCHITECT’, TO_DATE(‘1-5-2000’,‘DD-MM-YYYY’), 70000, NULL, 10 ); INSERT INTO EMPLOYEE VALUES( 1003, ‘JAMES’, ‘MADINSAON’,‘MANAGER’, TO_DATE(’19-6-1988′,‘DD-MM-YYYY’), 80400, NULL, 40 ); INSERT INTO EMPLOYEE VALUES ( 1004, ‘JONES’,‘NICK’, ‘HR ANALYST’, TO_DATE (‘2-01-2003’,‘DD-MM-YYYY’), 47000, NULL, 30 ); INSERT INTO EMPLOYEE VALUES ( 1005, ‘LUCY’,‘GELLLER’, ‘HR ASSOCIATE’, TO_DATE(’13-JUL-2008′,‘DD-MM-YYYY’) , 35000, 200, 30 ); INSERT INTO EMPLOYEE VALUES ( 1006, ‘ISAAC’, ‘STEFAN’, ‘TRAINEE’, TO_DATE(’13-12-2015′,‘DD-MM-YYYY’), 20000, NULL, 40 ); INSERT INTO EMPLOYEE VALUES ( 1007, ‘JOHN’,‘SMITH’, ‘CLERK’, TO_DATE(’17-12-2005′,‘DD-MM-YYYY’), 12000, NULL, 10 ); INSERT INTO EMPLOYEE VALUES ( 1008, ‘NANCY’,‘GILLBERT’, ‘SALESMAN’, TO_DATE(’20-2-1981′,‘DD-MM-YYYY’), 16000, 300, 10 ); |
Leave a Reply